Sunday, December 31, 2017

Favorites Projects of 2017

Happy New Year!! I want to wish everyone a very happy new year, and I hope it will be filled with fun and joy and many creative projects.

As always at the end of a year, I go through my posts and pick some favorites. It is kind of a random process, because I am not good at picking favourites, and to narrow it down, I will pick one project from each month (and two from a few).


From January, I picked this Old Nonsense art journal page. It is happy and hopeful and fits perfectly at the start of a new year.

Layers of ink - Dark Tower Assemblage Clock by Anna-Karin Evaldsson

From February, I picked my Dark Tower Assemblage Clock, inspired by the Dark Tower book series by Stephen King. I had such fun adding all kinds of details relating to the story.

Layers of ink - Set Sail Art Journal Page by Anna-Karin Evaldsson

I picked two projects from March, since I really wanted to include this colorful art journal page in a post on New Year's Eve. It has such a positive theme. I haven't picked my one little word for 2018 yet, but maybe it should be one of these.

Layers of ink - Fringed Flowers in a Frame by Anna-Karin Evaldsson

From March, I also picked this Quilled Flowers in a Frame, since I really like the look of fringed flowers, and because of the lovely sentiment by Wendy Vecchi.

Layers of ink - Bright Words in a Frame by Anna-Karin Evaldsson

From April, I picked my Bright Words in a Frame project, because of all the colorful words, and the cute photo of Leo.

Layers of ink - Vintage Burlap Panel by Anna-Karin Evaldsson

I wasn't sure what to pick from the month of May, but I really like this burlap panel with a photo of my grandmother when she was young. It now hangs on the wall in front of my desk.

Layers of ink - Stay Brave Art Journal Page by Anna-Karin Evaldsson

One of my favorite surfaces to work on this year, has been Dina Wakley's Media Journal, and this Stay Brave art journaling page was made on one of the watercolor pages in the journal.  It's my pick for June, also since I really like the colors.

Layers of ink - Distressed Texture Tag by Anna-Karin Evaldsson

From July, I picked my Distressed Texture Tag, simply because I had such fun using lots of distress techniques andd adding words and details.

Layers of ink - Woodgrain Chalkboard Easel by Anna-Karin Evaldsson

This Woodgrain Chalkboard Easel also comes from July, and I like it because of the photo of the three of us from a visit to South Africa. Anton has it in his room, and on the back there is a photo of him on his own.

Layers of ink - Miniature Bookshelf with Handmade Books by Anna-Karin Evaldsson

August was a fairly easy pick, since this Miniature Bookshelf with Handmade Books is something I had planned to do for a long time. I had such fun making all the books and picking tiny photos to go with them.

Layers of ink - You Matter by Anna-Karin Evaldsson

I still had to pick a second project for August, namely this You Matter wall-hanger, with an education theme.

Layers of ink - Wildflowers in a Mason Jar by Anna-Karin Evaldsson

From September, I picked this Wildflowers in a Mason Jar tag. I like the way the textured background turned out and that it is neutral enough not to take too much attention from the small flowers.

Layers of ink - Autumn Days Layout by Anna-Karin Evaldsson

October was another difficult month to pick from, but I really like this Autumn Days layout featuring Leo, made witth dies and embossing folders by Eileen Hull. Other favorite projects from October were my Alphabet Notebook and Sketchbook Journal, but since I posted them in an Eileen Hull recap post a couple of days ago, I didn't add them here.

Layers of ink - Narnia December Daily Journal by Anna-Karin Evaldsson

From November, I picked my Narnia-inspired December Daily journal, not only because it is one of my favourite projects of the year, but also because it started a Chronicles of Narnia reading marathon where I have been reading for Anton. He reads a bit here and there too.

Layers of ink - Winter Watercolor Notebooks by Anna-Karin Evaldsson

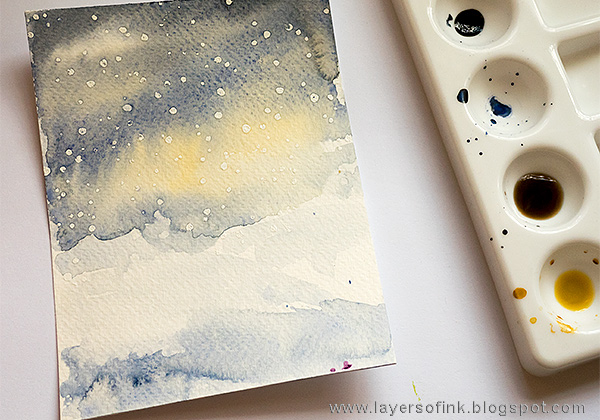
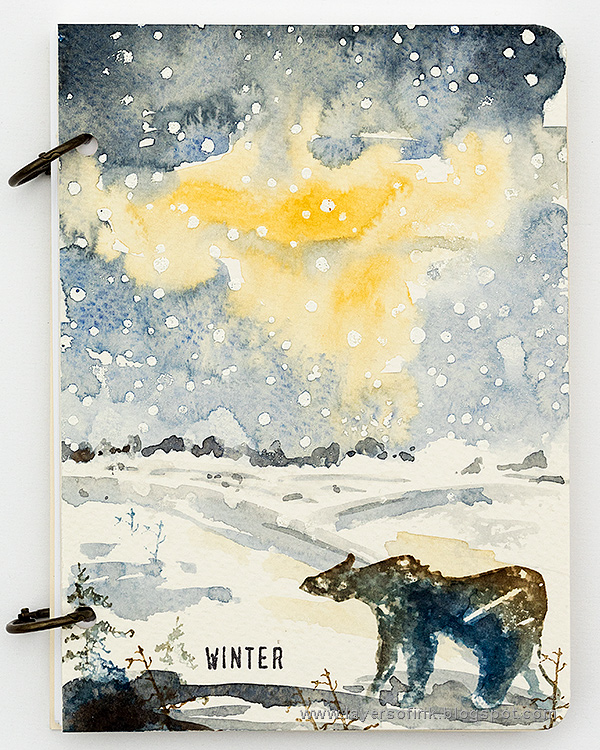
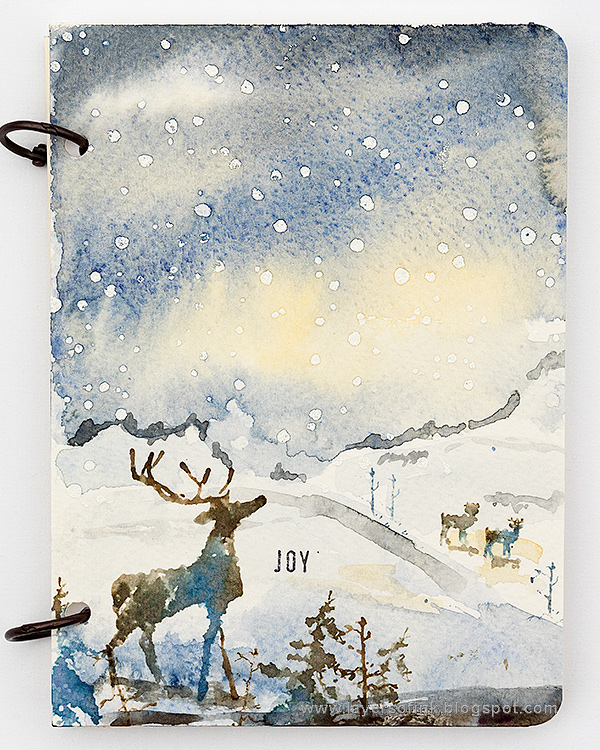
I picked two projects from December. I really enjoyed making these Winter Watercolor Notebooks. The combination of watercolors and stamping holds so much potential. I ended up making ten of these little books.

Layers of ink - Winter Penguin by Anna-Karin Evaldsson

And let's finish this post with a fun little Penguin card. I love the sweet SSS Picture Book Hugging Penguin and the icy background.

There is just about ten hours left of 2017 as I am typing this. Thank you so much for all your comments and support through this year. I am looking forward to a new year full of adventures, everyday life, happiness and creative projects.

Happy New Year!!

Anna-Karin


Wednesday, December 27, 2017

Gift eBook Recap

Hi all! I hope you had a really wonderful Christmas. We have had a lovely time together with family and the boys have loved it. A fun surprise for them was an unknown Santa who came on Christmas Eve to hand out gifts. Anton was pretty sure it was going to be his uncle and got a big surprise when it appeared to be a real Santa instead.

I have been offline during Christmas, but today I wanted to share a post for the Eileen Hull Inspiration Team. This month, the team has been sharing projects that are published in Eileen's new Gifts to Die For e-Book, by Bella Crafts Publishing. My projects have been up on the blog before, so I thought I'd do a little recap post instead. These are all tutorials, and you'll find the links below the photos.

Layers of ink - Sketchbook and Alphabet Journals tutorial by Anna-Karin Evaldsson with Eileen Hull Sizzix Journal die.

Both my Sketchbook Journal and Alphabet Notebook Journal were made for Anton to practice drawing and writing in. They helped to make it even more fun for him to practice. The base for both is Eileen's Sizzix Journal die.

Layers of ink - Seaside Journal tutorial by Anna-Karin Evaldsson with Eileen Hull Sizzix Journal die.

The Seaside Journal was made with that same die and holds summer memories. I am looking forward to doing more projects with the Journal die next year.

Layers of ink - Seaside Journal tutorial by Anna-Karin Evaldsson with Eileen Hull Sizzix dies.

One of my other projects in the e-Book is this Fidget Spinner bag, made for what was maybe the biggest craze of the year. The base is Eileen's House Pocket die and the fidget spinners were made with one of the flowers in the Stitchy Flowers & Leaf set. Both are from the Heartfelt collection.

Layers of ink - Felt House Card Tutorial by Anna-Karin Evaldsson

Dies are so versatile, and this Felt House card was made with the same House Pocket die that was used for the Fidget Spinner die, as well as the Birds & Butterflies and Stitchy Flowers & Leaf sets.

Layers of ink - Flower Basket Tutorial by Anna-Karin Evaldsson with Eileen Hull Sizzix Heartfelt dies.

As I am typing this up, I realize that the Stitchy Flowers & Leaf was one of my most used die sets this year, and here you see it again, on a Flower Basket, made with the Basket die as a base.


There are over 60 gift projects in Gifts to Die For created by designers from around the world. For each project, there is a link to a tutorial. The book is a great source of inspiration for using Eileen's Sizzix dies, and it is also a joy for the eye to look through.

I will be back again before the new year, with my a post about my favourite projects throughout this year. Two of them happened to be in this book, namely the Sketchbook and Alphabet Journals.

Thank you so much for stopping by today! Happy crafting!

Anna-Karin

Friday, December 22, 2017

Snowy Snowman Tag Tutorial

Hello everyone! I just wanted to share one last project before Christmas, and wish everyone a very Merry Christmas! The boys can't wait for Christmas Eve (which is the main day of family celebrations here).

Here's a Sizzix tutorial for a very snowy tag, with some fun techniques. The good thing with winter type themes is that they aren't only for Christmas, but work well for the entire winter.

Layers of ink - Snowy Winter Tag Tutorial by Anna-Karin Evaldsson with Tim Holtz Sizzix Snowman Scene

When I was looking at the packaging of the Tim Holtz Snowman Scene set, I wanted to play around with using some black cardstock for my background. Black cardstock is something that I don't use a lot, except for as mattes, but I rarely do techniques on top of a black surfaces. I really should reach for black cardstock more often.

Layers of ink - Snowy Winter Tag Tutorial by Anna-Karin with Tim Holtz Sizzix Snowman Scene

This is the Snowman Scene set that I used for my tag. I love the look of the layered snowman and the background elements will work well for projects throughout the year.

Layers of ink - Snowy Winter Tag Tutorial by Anna-Karin with Tim Holtz Sizzix Snowman Scene

I used two black tags from Ranger, one as a base and the other one was die cut into two pieces, using both background dies. You can also die cut tags from black cardstock.

Layers of ink - Snowy Winter Tag Tutorial by Anna-Karin with Tim Holtz Sizzix Snowman Scene

Paint white at the top, as snow.

Layers of ink - Snowy Winter Tag Tutorial by Anna-Karin with Tim Holtz Sizzix Snowman Scene

Add even more dimensional snow with Grit-Paste, but don't cover up all the white paint.

Layers of ink - Snowy Winter Tag Tutorial by Anna-Karin with Tim Holtz Sizzix Snowman Scene

Glue the two pieces to the background as shown and smear Opaque Crackle Paste on the lower part of the tag. As it dries, cracks will appear, and the paper might roll up a bit since the paste shrinks slightly as the cracks appear. I glued my entire tag to another tag with matte medium, when the crackle paste was dry.

Layers of ink - Snowy Winter Tag Tutorial by Anna-Karin with Tim Holtz Sizzix Snowman Scene

Die cut the pieces for the snowman. I used Sizzix Paper Leather for everything, apart from the hat, which was die cut with a left-over piece of black tag, and the scarf, which is die cut from wool felt. Paper Leather is perfect for detailed die cuts and is very tough and really hard to tear, even if you try.

Layers of ink - Snowy Winter Tag Tutorial by Anna-Karin with Tim Holtz Sizzix Snowman Scene

Ink the edges of the snowman's body, to create depth. Glue together and smear a little Grit-Paste here and there.

Layers of ink - Snowy Winter Tag Tutorial by Anna-Karin with Tim Holtz Sizzix Snowman Scene

For that really snowy look, splatter white paint with a splatter brush all over the background and a bit on the snowman too.

Layers of ink - Snowy Winter Tag Tutorial by Anna-Karin with Tim Holtz Sizzix Snowman Scene

Here you see the effect of the three types of snow: white paint, Grit-Paste, and splatters.

Layers of ink - Snowy Winter Tag Tutorial by Anna-Karin with Tim Holtz Sizzix Snowman Scene

I tied the tag with a piece of twine from a gift I got and a little cheese cloth.

Layers of ink - Snowy Winter Tag Tutorial by Anna-Karin with Tim Holtz Sizzix Snowman Scene

Isn't the snowman fun? I love how the different snowman dies and stamps I have look so different, each one has it's own look and personality. Now, we only need some proper snow so that we can make a real one too. I thought it was a little empty behind my snowman, so I die cut two Woodlands trees from Paper Leather and glued them down.

Layers of ink - Snowy Winter Tag Tutorial by Anna-Karin with Tim Holtz Sizzix Snowman Scene

The splatters makes him look even more a part of the snowy landscape.

Layers of ink - Snowy Winter Tag Tutorial by Anna-Karin with Tim Holtz Sizzix Snowman Scene

Here you see the effect of the inking and Grit-Paste better. It will also look great with foam dots in between those circles.

Layers of ink - Snowy Winter Tag Tutorial by Anna-Karin with Tim Holtz Sizzix Snowman Scene

Die cut a sentiment from black Paper Leather and tie a ribbon as a border. Some pieces of crackle texture might fall off, you can add a layer of glossy medium on top if you want to secure it better.

I will be back again before the New Year, but I still want to thank you now for visiting my blog through the year and for all the lovely comments. I really enjoy reading them. I hope you will have a wonderful Christmas and that you will be able to relax and maybe get a little bit of crafty time.

Happy crafting! Merry Christmas!

Anna-Karin

Supplies:


Sizzix Thinlits Die Set 10PK - Snowman Scene
[ SZZ | SSS ]
Sizzix Thinlits Die Set 2PK - Woodlands
[ SZZ | SSS ]
Sizzix Thinlits Die Set 17PK - Holiday Words: Script
[ SZZ | SSS ]
Sizzix Paper Leather Sheets - 8 1/2
[ SZZ ]
Simon Says Stamp Wool Felt Sheets OCEAN WAVES Felt9 Spring Plush
[ SSS ]
Dina Wakley Ranger WHITE Media Heavy Body Acrylic Paints MDP41184
[ SSS ]
Tim Holtz DISTRESS GRIT PASTE Ranger TDA53422
[ SSS ]
Tim Holtz Distress Collage Medium MATTE TDA47933
[ SSS ]
Ranger TEXTURE PASTE OPAQUE CRACKLE 4oz INK57505
[ SSS ]
Sizzix Paper Leather Sheets - 8 1/2" x 11" White, 10 Pack
[ SZZ ]
Sizzix Big Shot Machine Only (White & Gray)
[ SZZ | SSS ]
Sizzix Accessory - Multipurpose Platform, Standard
[ SZZ | SSS ]
Sizzix Accessory - Cutting Pads, Standard, 1 Pair (Purple w/Silver Glitter)
[ SZZ | SSS ]
Tim Holtz Tonic Craft MINI SNIPS Scissors 816E
[ SSS ]
Tim Holtz Distress SPLATTER BRUSH TDA47841
[ SSS ]
Tim Holtz DISTRESS SPRAYER Ranger 4 Ounces TDA47414
[ SSS ]
Dina Wakley Ranger PALETTE KNIFE Media MDA41771
[ SSS ]
Ranger MINI ROUND INK BLENDING TOOLS IBT40965
[ SSS ]
Ranger MINI ROUND FOAM REFILLS for Mini Round Ink Blending Tools IBT40972
[ SSS ]

Monday, December 18, 2017

Wildlife Birthday Card

Hello everyone! Christmas is almost here and the past months have really flown by. At the same time, if I look back at something specific we did just two weeks ago, it already feels like it was long ago. Time is funny that way.


This is our last Simon Says Stamp Monday challenge of the year, and we will be back again on January the first. So this challenge runs for two weeks. Our theme is Party!

Thank you so much for everyone who has joined us and posted project during the year. It is such fun to check out all the creative projects that are made for each challenge.

Don't miss the last project by our December guest designer Valarie-Jael, with her blog Bastelmania

Layers of ink - Wildlife Birthday Card by Anna-Karin Evaldsson with Darkroom Door African Trees stamps

I was first planning to do an art journal page, but then remembered that I needed a birthday card for a special friend, and I wanted her to have something newly made. She shares my love for Baobab trees, and I was lucky to find one on the Darkroom Door African Trees set. The watercolored background was in my scrap box, and was one of the backgrounds I did for my Versatile Watercolor Stamping class on Skillshare. I also did a similar background on this Watercolor Tree Journal page.

Layers of ink - Wildlife Birthday Card by Anna-Karin Evaldsson with Darkroom Door African Trees stamps

The clouds were done by smearing a tiny bit of Distress Micro Glaze in the sky, which resist the watercolor paint. 

Layers of ink - Wildlife Birthday Card by Anna-Karin Evaldsson with Darkroom Door African Trees stamps

I lost focus for a while when stamping the sentiments and messed up. Normally, I would cover it up by stamping on a strip of paper, but I didn't want anything extra in the sky, so I decided to leave it as it was. The sentiments were done with the SSS Friendship Blooms and Thoughtful Messages sets.

Layers of ink - Wildlife Birthday Card by Anna-Karin Evaldsson with Darkroom Door African Trees stamps

The trees and animals were inked with Distress Inks and misted with water before stamping, for a watercolor effect, similar to my Winter Watercolor Notebooks from last week. I used Forest Moss and Peeled Paint for the trees. Forest Moss is a really nice brownish green color, which I don't use often enough.

Layers of ink - Wildlife Birthday Card by Anna-Karin Evaldsson with Darkroom Door African Trees stamps

The elephant stamped a little too light at first, so I redid it with darker colours, so that it would stand out as a silhouette instead. Shadows were painted under the animals and trees. My almost favorite part of the whole scene is that little blue spot in the foreground.

Layers of ink - Wildlife Birthday Card by Anna-Karin Evaldsson with Darkroom Door African Trees stamps

I also added a Clippings Sticker. The edges of the watercolor paper were distressed, and I layered the panel on white cardstock and a piece of vellum before mounting it to the card.

Layers of ink - Wildlife Birthday Card by Anna-Karin Evaldsson with Darkroom Door African Trees stamps

On the inside of the card, I stamped this sentiment, from the Darkroom Door Wilderness Vol. 1 set, which is one of my favorite quotes, and I am pretty sure my friend will like it too.


I hope you will join us this week in our Party! challenge. As always, you have a chance to win a $50 gift voucher to do some fun shopping at Simon Says Stamp. You have two weeks for this challenge until Monday 1 January 8am Ohio time. 1pm UK time, 2 pm CET to join in.


Don't forget to follow Simon Says Stamp on Instagram, they post great stuff daily. 


Do you use Instagram? If so please add #sssmchallenge so we can see your entries there too.


Thank you for taking the time to stop by my blog today! I will be back again before Christmas. 

Happy crafting!

Anna-Karin

Supplies

Darkroom Door AFRICAN TREES
[ SSS ]
Darkroom WILDERNESS VOLUME 1
[ SSS ]
Simon Says Clear Stamps THOUGHTFUL MESSAGES
[ SSS ]
Simon Says Clear Stamps FRIENDSHIP BLOOMS
[ SSS ]
Tim Holtz Idea-ology CLIPPINGS
[ SSS ]
Winsor Newton COTMAN WATERCOLORS
[ SSS ]
Ranger Archival Ink JET BLACK
[ SSS ]
Ranger WATERCOLOR PAPER
[ SSS ]
Simon Says Stamp VELLUM
[ SSS ]
Simon Says Stamp WHITE CARDSTOCK
[ SSS ]
Tim Holtz DISTRESS MICRO GLAZE
[ SSS ]
Tim Holtz FADED JEANS
[ SSS ]
Tim Holtz HICKORY SMOKE
[ SSS ]
Tim Holtz PEELED PAINT
[ SSS ]
Tim Holtz FRAYED BURLAP
[ SSS ]
Tim Holtz FOREST MOSS
[ SSS ]
Tim Holtz BLACK SOOT
[ SSS ]
Tim Holtz GROUND ESPRESSO
[ SSS ]
Tim Holtz DISTRESS SPRAYER
[ SSS ]
Hero Arts SMALL BLOCK TRIO CLEAR ACRYLIC BLOCKS CL082
[ SSS ]
Hero Arts CLEAR ACRYLIC BLOCK 4 x 4.5 cl081
[ SSS ]
Ranger Non Stick CRAFT SHEET
[ SSS ]
Tim Holtz Tonic PAPER DISTRESSER
[ SSS ]


* Please note: the links are affiliate links, for which I receive a small percentage of sales generated by the link, at no extra cost to you.

Sunday, December 10, 2017

Winter Watercolor Notebook Tutorial

Hi and welcome to my blog today! The world is white outside my window, and although the snow is not very deep, it makes everything lighter. I particularly like when the branches of the trees are covered in snow.


This week at the Simon Says Stamp Monday Challenge blog we have a Christmas / Winter Holiday theme. And don't miss checking out the project of our December guest designer Valarie-Jael, with her blog Bastelmania

Layers of ink - Winter Watercolor Notebook Tutorial by Anna-Karin Evaldsson

I started out planning to make cards, but then thought about notebooks, since I needed some small gifts for Christmas. Once I started, I had such fun making these winter watercolor notebooks, that I made four of them. There is some stamping involved too, of course. The notebooks are 4.3 x 6 in (11 x 15 cm) big, which is a good size for a notebook. I used good quality paper inside, so the books can also be used as sketchbooks. The Great Outdoors set by Tim Holtz is perfect for a winter scene.

Layers of ink - Winter Watercolor Notebook Tutorial by Anna-Karin Evaldsson with Tim Holtz Great Outdoors stamps

These are the four notebooks that I made. When I was done, both Anton and I wanted one of our own too, so I might need to make another two.

Layers of ink - Winter Watercolor Notebook Tutorial by Anna-Karin Evaldsson

Start out by white embossing Tim Holtz Flurry background on the top part of the watercolor paper. On some of the books, I stamped it about two thirds down on others more to the middle. Paint with watercolor paint. I used a dark greyish blue and a slightly more blue mix for the sky, both made by mixing Ultramarine Blue with Burnt Sienna. The yellow is Raw Sienna. You can also use Distress Ink, by first smearing them on a non-stick craft sheet and then misting with water. A mix of Faded Jeans, Hickory Smoke, and Fossilized Amber, might give a similar look.

Layers of ink - Winter Watercolor Notebook Tutorial by Anna-Karin Evaldsson

Paint soft snowy hills next (the other examples might be better than the one on this photo).

Layers of ink - Winter Watercolor Notebook Tutorial by Anna-Karin Evaldsson

Add some shading to the snowy hills, and don't forget to add a little bit of yellow too, which warms up the scene. Make the scenes darker at the front, to add a sense of perspective. I also painted some trees in the far distance.

Layers of ink - Winter Watercolor Notebook Tutorial by Anna-Karin Evaldsson

Now to the stamping. The animals from Tim Holtz Great Outdoors set were inked up first with Faded Jeans, and then I dabbed on a little Hickory Smoke and a little Ground Espresso. Mist about three times with water before stamping. Repeat with the tiny deer from Hero Arts Winter Silhouettes set, but using only one mist of water. I also added some trees from the Great Outdoors set. Paint shadows under the animals to ground them to the scene.

Layers of ink - Winter Watercolor Notebook Tutorial by Anna-Karin Evaldsson

I cut mat board for my covers and glued the watercolor panel to the mat board with Matte Medium. The outer corners were rounded for a finished look. Use  your favourite papers for the inside and cut them just a little bit smaller than the covers. Punch holes with a Crop-a-Dile and bind with rings.

Layers of ink - Winter Watercolor Notebook Tutorial by Anna-Karin Evaldsson

I varied the amount of water in the paint on the different notebooks, which is why the colors are darker on some of them. The darker the colors, the more dramatic the sky. I am not sure which of the notebooks I like the best, but it might be this one, and the reason has to do with a mistake that turned out pretty cool.

Layers of ink - Winter Watercolor Notebook Tutorial by Anna-Karin Evaldsson

This was the last paper that I stamped when doing the white embossing and I pressed too hard on the stamp and got embossing ink in places were it wasn't supposed to be. I removed some of it with a paint brush, but not all of it, and here you can see the cool resist effect of those unplanned areas. They look kind of like clouds, or maybe snowy mountains in the far distance.

Layers of ink - Winter Watercolor Notebook Tutorial by Anna-Karin Evaldsson

I love watercolor stamping, because the result is never exactly the same. Use a piece of scrap paper to mask of the hill in the front, so that it looks like the deer is standing behind the hill.

Layers of ink - Winter Watercolor Notebook Tutorial by Anna-Karin Evaldsson

The bear book also has a dramatic sky. Don't fiddle around with the watercolour paint, instead let the paints blend on their own on the paper and magic happens.

Layers of ink - Winter Watercolor Notebook Tutorial by Anna-Karin Evaldsson

If you are not happy with the stamped impression, you can always go in and add some watercolor paint here and there. I thought the bear needed a bit of the same blue as the sky, since the Faded Jeans wasn't a complete match, so I simply painted some on.

Layers of ink - Winter Watercolor Notebook Tutorial by Anna-Karin Evaldsson

The sentiments also come from the Great Outdoors set. I only used one word from the sentiments, to make the notebooks into winter notebooks and not Christmas ones. This sentiment said 'winter wishes'.

Layers of ink - Winter Watercolor Notebook Tutorial by Anna-Karin Evaldsson

Here's another look at the snowy sky.

Layers of ink - Winter Watercolor Notebook Tutorial by Anna-Karin Evaldsson

Here's another of the deer books, with a background of soft snowy hills.

Layers of ink - Winter Watercolor Notebook Tutorial by Anna-Karin Evaldsson

The blue, brown and grey mixes in a nice way on the stamp.

Layers of ink- Winter Watercolor Notebook Tutorial by Anna-Karin Evaldsson

And here is the last deer book, also with a soft looking sky.

Layers of ink - Winter Watercolor Notebook Tutorial by Anna-Karin Evaldsson

You could add more stamped trees if you want too, or even make them the main feature.

Layers of ink - Winter Watercolor Notebook Tutorial by Anna-Karin Evaldsson

All lined up, the notebooks almost looks like they are part of a continues scene, which wasn't intended at all, but something I discovered when I took these photos.

I hope you will join us this week in our Christmas / Winter Holidays challenge. As always, you have a chance to win a $50 gift voucher to do some fun shopping at Simon Says Stamp. You have until Monday 8am Ohio time. 1pm UK time, 2 pm CET to join in.


Don't forget to follow Simon Says Stamp on Instagram, they post great stuff daily. 


Do you use Instagram? If so please add #sssmchallenge so we can see your entries there too.


Thank you for taking the time to stop by my blog today!

Happy crafting!

Anna-Karin

Supplies

Tim Holtz GREAT OUTDOORS
[ SSS ]
Tim Holtz FLURRY AND PINE
[ SSS ]
Hero Arts Clear Stamps WINTER SILHOUETTES
[ SSS ]
Winsor Newton COTMAN WATERCOLORS PLUS 12
[ SSS ]
Ranger DINA WAKLEY MEDIA Archival Mixed Media Palette
[ SSS ]
Canson MONTVAL WATERCOLOR 9x12 Pad
[ SSS ]
Sizzix LITTLE SIZZLES MAT BOARD PACK 6x13
[ SSS ]
Neenah Classic Crest 80 LB SMOOTH SOLAR WHITE
[ SSS ]
Tim Holtz Idea-ology MINI BOOK RINGS
[ SSS ]
Tim Holtz Distress Ink Pad FADED JEANS
[ SSS ]
Tim Holtz Distress Ink Pad HICKORY SMOKE
[ SSS ]
Tim Holtz Distress Ink Pad GROUND ESPRESSO
[ SSS ]
Tim Holtz Distress Collage Medium MATTE
[ SSS ]
Simon Says Stamp EMBOSSING POWDER WHITE Fine Detail
[ SSS ]
Tsukineko Versamark EMBOSS INK PAD
[ SSS ]
Tim Holtz Tonic GUILLOTINE COMFORT PAPER TRIMMER
[ SSS ]
Tim Holtz Distress COLLAGE BRUSH SET
[ SSS ]
Tim Holtz DISTRESS SPRAYER
[ SSS ]
Hero Arts Rubber Stamp CLEAR ACRYLIC BLOCK
[ SSS ]
Hero Arts Rubber Stamp SMALL BLOCK TRIO CLEAR ACRYLIC
[ SSS ]
Ranger US HEAT IT CRAFT TOOL United States Use
[ SSS ]
Ranger EUROPEAN VOLTAGE HEAT IT CRAFT TOOL
[ SSS ]
We R Memory Keepers CROP-A-DILE
[ SSS ]
We R Memory Keepers Cropadile CORNER CHOMPER
[ SSS ]
Prima Marketing ROUND #10 Watercolor Artist Brush
[ SSS ]
Prima Marketing ROUND #2 Watercolor Artist Brush
[ SSS ]
Prima Marketing ROUND #4 Watercolor Artist Brush
[ SSS ]


* Please note: the links are affiliate links, for which I receive a small percentage of sales generated by the link, at no extra cost to you.